As usual, I left things till the last minute…I don’t know how to do it any other way. Under pressure is usually when I am most motivated and inspired. I got a little carried away with my Gold Leaf paint and pens and painted just about everything in it last night.
I can’t help that my natural artistic impulses are the same as every 2 year old who has just been given their first ever box of crayons (to take all the colors, smash them together, color all the paper, mess all over the floor and then take a nap curled up in the eye of the hurricane). I swear I have every intention of trying to become a decent artist when I get out my graphite pencils and little eraser to practice sketching. Somehow though, I always end up on the floor surrounded by paint in every color and shade available. But Im at my happiest and most inspired making my kaleidoscopic messes…
I happened to spot the inspiration for this DIY art project in an advertisement in House Beautiful magazine for minted.com. I ripped it right out (don’t worry, it was my copy!) , taped it to my wall and started to go to work on my own version. Later, I was able to investigate further and discovered (thank you pinterest) that the Artist’s is Yao Cheng, she specials in beautiful watercolor paintings and her online store on Minted’s website is FULL of stunning watercolor prints. The above piece and the object of inspiration is “Hexagon Cluster,” and you can purchase her Limited Edition of Hexagon Cluster print on Minted (or click through the links) for anywhere from $20 to $200 depending on size and finish.
Here is everything you will need to make it:
1) watercolor paints (the Kids Crayola watercolors work just fine) and paper (brushes and cups of water as well)
I suggest the following liquid watercolors for bright, vibrant colors:
Sargent Art 8-Ounce Watercolor Magic Set (10 different watercolors for $49.95)
click on picture to view in Amazon
or Dr. Phil’s Concentrated Watercolors (my personal favorites) They average about $5.00 a bottle or a set of 14 is around $69.99.
Dr Phil’s Concentrated Watercolors (click pic to view in Amazon)
2) Watercolor Paper Pad
For the best price and quality, I suggest Strathmore 360900 Cold Press 140-Pound 12-Sheets Strathmore Watercolor Paper Pad, 9-Inch by 12-Inch, which is only around $7.00, also available on Amazon:
Click photo to purchase in Amazon
3) Thick, heavyweight white paper Mixed Media paper works well, just something to hold the weight of mixed media and glue without tapering.
4) Scissors and a gluestick!
The How To:
The steps to making this DIY project are super simple. But since I’m not sure of how the original artist created her stunning piece so I’ll tell you how I made my version.
1) Get out your watercolors and watercolor paper and go crazy (this is one of my favorite things in the world to do). You don’t need any fancy paper or expensive watercolors. In fact, I mostly used plain old, reliable Crayola Washable Watercolors (available in probably every single pharmacy and grocery store in America). because I had just moved to Grand Rapids from Chicago when I got this project itch, I had none of my supplies and couldn’t wait a few days till I went home again.
* Try experimenting with colors…I love playing with colors and mixing and matching up colors I wouldn’t usually put together while doing this…I tend to lean towards bright, bold, colors but what I love about Cheng’s is that she uses subtle, subdued colors with a pop of bold color that makes the piece stand out. Her use of subtle tones and light/grey hues accentuates the rich blues and the subtle use of warm orange colors all come together to create a vibrant, yet refreshingly simple and peaceful piece of art that would compliment many differently styled rooms.
2) Using a ruler or something to help you draw straight lines, trace out 20-30 hexagons (6 sided shapes). Make sure to make all different sized hexagons..the sides don’t necessarily have to be symmetrical or have all equal lengths..this will help to add to the abstract and organic feeling of the piece.
3) Arrange them in a way you like on your heavyweight art board..the only rule I used for myself was that each shape has to be touching another shape by at least one point..I think this helps adds continuity and fluidity of the artwork and helps guide the viewer’s eye from each unique hexagon to the next.
I also tried another technique and did one piece where all the sides of the shapes had to be touching sides perfectly..this one took a little more time and a lot of cutting down shapes to fit better…
4) admire, frame and hang!
Here are a few that I did, as you can see, I have a hard time using natural and subtle colors- which I think makes my finished pieces a little to “in your face.” But to each their own!
Last week, I visited the absolutely amazing Downtown Market in Grand Rapids, Michigan with some friends for the first time to attend a workshop called How to Build A Terrarium. If you are ever in Grand Rapids, you have to visit the Downtown Market. They have the indoor Market Hall, a “culinary collective” of artisan products including a Bakery, Juice Bar, Coffee Bar, Wine Bar, Meat Market, Bake Shoppe, AND gourmet restaurants including: Fish Lads, Rak Thai, Sushi Maki, Tacos El Cunado AND even a Creperie.
In the summer, they have an Outdoor Market three times a week and in the Fall, every Saturday from 9am to 2pm.
Finally, they also offer a full schedule of classes, programs and workshops which include everything from: yoga, cheese making, Introduction to Aromatherapy & Essential Oils, Cooking Classes, Mommy and Me Activities, to Greenhouse workshops. Click Here to see their schedule of upcoming classes. This is where I went with two of my friends to do the How to Build a Terrarium Workshop. I put together a cheat sheet of the ingredients you will need based on what I learned at the workshop to share with you:
1. First, start by putting about 1 inch layer of gravel at the bottom of your container, to fill up space in the jar and to keep the soil from being to damp.
2. On top of the gravel, put approximately .5in to 1.5in layer of activated charcoal, also to help soak up extra water.
3. Add your cactus/succulent potting soil. The amount of soil you want to use really depends on the size and shape of your container. You want a nice, thick layer so that the soil comes up about to the bottom of your opening.
4. Plant your succulents in the soil. Give them space to breathe.
5. Add your decorative items on the top of the soil after you planted your succulents. This will help weigh the soil down.
Sun Requirements:
* Most succulents need about 6 hours a day of indirect sunlight. Make sure your terrarium is in a cool, well ventilated area.
* It helps to place your terrarium near a south or east facing windows in the winter in order to get maximum sunlight exposure.
* Observe your succulents when they are by windows, as sunlight may be magnified in the glass and can scorch leaves. Adjust accordingly.
Water Requirements:
* In the winter, you may water just once every 2-3 weeks.
* In the summer, it is closer to once a week. Water in the morning.
* If you are unsure, poke your finger in the soil and if it is completely dry then it’s probably a good idea to water it.
And voila! You have a start on a green thumb with a lovely & easy and organic terrarium, all your own. Does anyone have any other tips for making terrariums? If you have one, or make one, I would love to see pictures of them!! succulent
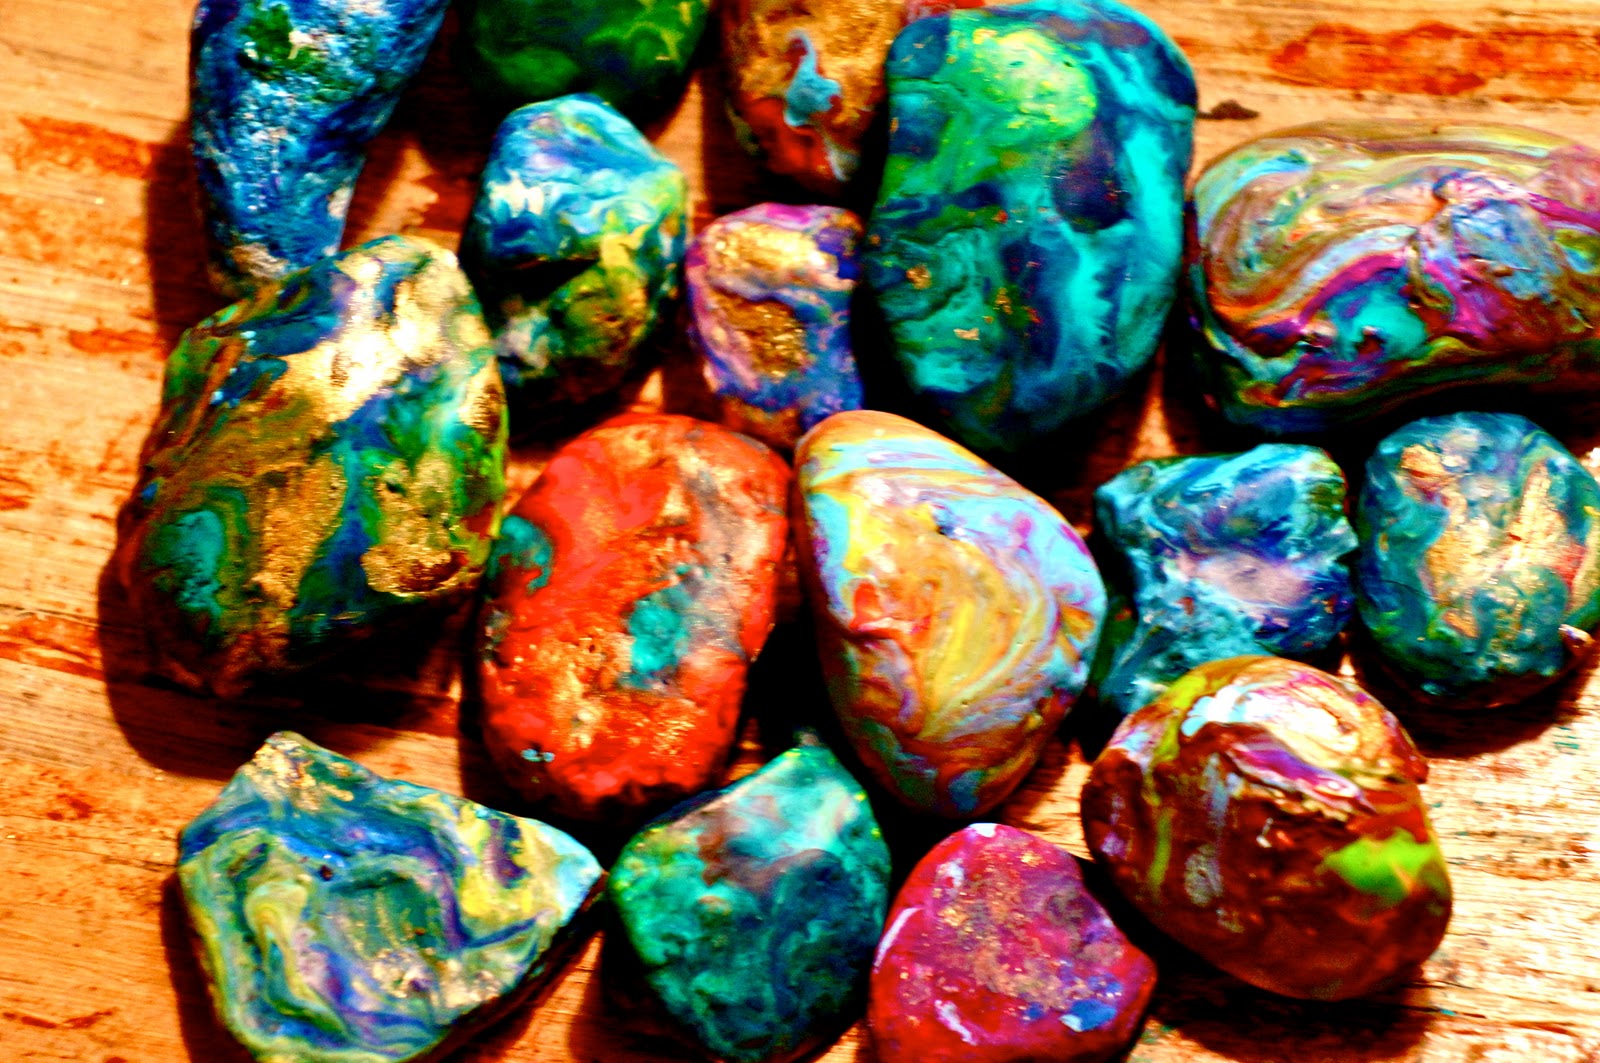
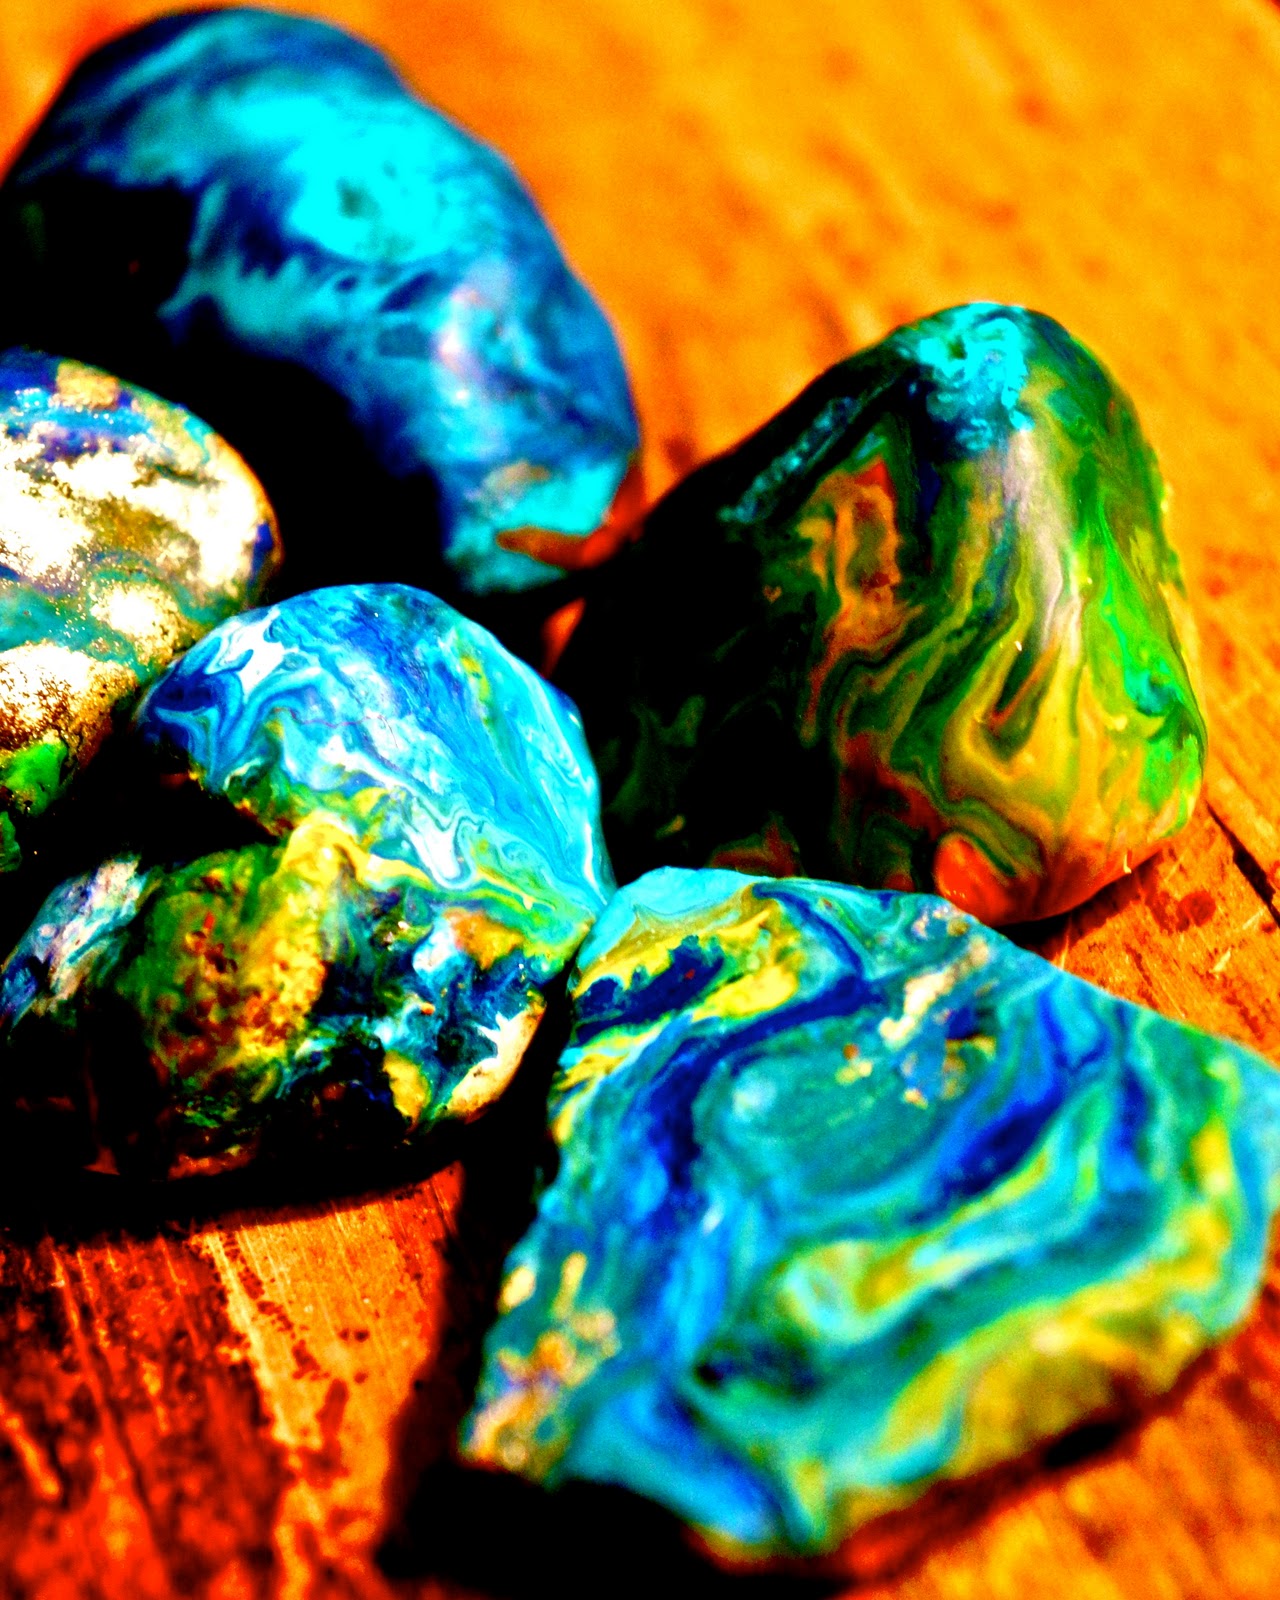
I love melted rocks. Melted rocks rock. I did this art activity with two 6 and 7 year old boys and I think I enjoyed it more than they did (probably because I wouldn’t let them touch the hot rocks…and you know how boys are…they only want to do what they aren’t allowed to do:) ). Something about the simplicity of the activity and watching the crayon melt and mix and swirl with the other colors is so relaxing.
You will need:
smooth rocks- pick out some rocks from your garden (preferably smooth rocks with flattened tops) or you can buy a bag of river rocks from a craft supply store for fairly cheap.
crayons- The Crayola brand work perfectly fine…I had some oil pastels I also tried using…a few of them worked, the more thicker and more expensive they were, the LESS they worked because they didn’t melt as easy and didn’t mix with the other crayons. ALTHOUGH, saying that, one gold oil pastel I had from Blicks art store turned out to be the best. So, try a few different types and experiment.
an oven- or access to one.
An oven mitts (those babies come out of the oven hot)
Foil paper
a large (and preferably old and well used) baking tray
Instructions:
Pre-heat the oven to 350 degrees Farenheit
Wash off and dry the rocks if you grabbed them from the garden
Peel the paper off the crayons you want to use
Put foil paper on the oven tray (to keep any melted crayons from getting on the tray)
Place the rocks on the tray and put them in the oven for at least 15 minutes (the hotter they are the better)
Take the rocks out using the oven mitt (if you are doing this with children make sure to warn them NOT to place their hands directly onto the rock because they will born themselves) and place them on paper plates or foil sheets
Put the crayon onto the surface of the rock and push down firmly for a few moments. Use several different colors to get a colorful effect.


 I hope everyone has a wonderful Christmas with their loved ones! xoxoxo


