As a kid, I loved going through my fabulous grandma’s costume jewelry collection. I could never narrow it down to one or even two favorite accessories, and instead piled as many necklaces on as my little kid neck would allow.
So, once I became aware that layered statement necklaces were an actual trend and saw necklaces like Dylanex’s Falkor ($890):
I have been trying to create my own cheaper “DIY” version. I quickly realized it’s not quite as easy as throwing on every silver necklace I own and walking out the door. I feel like I am constantly walking a fine line between “fashionable” and “mentally unstable homeless person”, when it comes to my personal style. It was actually pretty difficult to mix and match pieces together to create something tasteful and stylish (and doesn’t look like I raided my Grandma’s costume jewelry with my eyes closed). I ended up with two layered statement pieces: one silver and one gold…Usually, I prefer gold colored jewelry but there are a lot of awesome silver metal boho statement necklaces out there to choose from.
Last week, I visited the absolutely amazing Downtown Market in Grand Rapids, Michigan with some friends for the first time to attend a workshop called How to Build A Terrarium. If you are ever in Grand Rapids, you have to visit the Downtown Market. They have the indoor Market Hall, a “culinary collective” of artisan products including a Bakery, Juice Bar, Coffee Bar, Wine Bar, Meat Market, Bake Shoppe, AND gourmet restaurants including: Fish Lads, Rak Thai, Sushi Maki, Tacos El Cunado AND even a Creperie.
In the summer, they have an Outdoor Market three times a week and in the Fall, every Saturday from 9am to 2pm.
Finally, they also offer a full schedule of classes, programs and workshops which include everything from: yoga, cheese making, Introduction to Aromatherapy & Essential Oils, Cooking Classes, Mommy and Me Activities, to Greenhouse workshops. Click Here to see their schedule of upcoming classes. This is where I went with two of my friends to do the How to Build a Terrarium Workshop. I put together a cheat sheet of the ingredients you will need based on what I learned at the workshop to share with you:
1. First, start by putting about 1 inch layer of gravel at the bottom of your container, to fill up space in the jar and to keep the soil from being to damp.
2. On top of the gravel, put approximately .5in to 1.5in layer of activated charcoal, also to help soak up extra water.
3. Add your cactus/succulent potting soil. The amount of soil you want to use really depends on the size and shape of your container. You want a nice, thick layer so that the soil comes up about to the bottom of your opening.
4. Plant your succulents in the soil. Give them space to breathe.
5. Add your decorative items on the top of the soil after you planted your succulents. This will help weigh the soil down.
Sun Requirements:
* Most succulents need about 6 hours a day of indirect sunlight. Make sure your terrarium is in a cool, well ventilated area.
* It helps to place your terrarium near a south or east facing windows in the winter in order to get maximum sunlight exposure.
* Observe your succulents when they are by windows, as sunlight may be magnified in the glass and can scorch leaves. Adjust accordingly.
Water Requirements:
* In the winter, you may water just once every 2-3 weeks.
* In the summer, it is closer to once a week. Water in the morning.
* If you are unsure, poke your finger in the soil and if it is completely dry then it’s probably a good idea to water it.
And voila! You have a start on a green thumb with a lovely & easy and organic terrarium, all your own. Does anyone have any other tips for making terrariums? If you have one, or make one, I would love to see pictures of them!! succulent
See what I did there…With the title? Yeah, I need to get out more. Before I start in to my epic blue hair adventures, I just want to thank all of my friends, family and anyone else out there who read my last blog post: “Blessed are The Cracked…” I struggled with posting it for a long time, as it went deeper than I usually go.
But when I posted a link to the article on my Facebook page (in an outright act of shameless self-promotion, and deleted it twice before I left it there) I was so blown away by everyones kind words and encouragement. I was walking around glowing for the entire day and it was such a boost in confidence that Im surprised I didn’t sprout peacock feathers out my bum! So thanks again.
Anyways, onto my latest mishap.
so this happened…
blue hair, don’t care (but kind of do!)
I have been toying with the idea of dying my hair some crazy color for awhile now…and as a lot of my more hair-brained (pun intended) ideas begin, I was up reeeaaally late on pinterest where I created a board just for my crazy hair color inspirations and pinning away.
Now, I will be the first to tell you, that I get quickly excited about ideas and don’t always think my them through. I just get caught up in the moment and fail to think clearly.
I convinced myself that I was mentally prepared to dye my hair because I went so far as to create a profile on Taaz.com (a website where you can try out different hair styles and make up using pictures of yourself). My idea of “thinking this through” was to upload a picture and try out some different hair styles. I promptly found and tried the only blue hair color style available, (on the gorgeous katy Perry). This is the picture they had:
Katy Perry’s blue hair
Gorgeous right? Yeah. Aaaaaaand well, here is how mine turned out….just in case you haven’t laughed today…
hahahahaha
Me and Katy are practically twins! But really, the website was actually really great and these “virtual makeover” websites have come a long way in the years since they first came out and I did it in high school, a good 15 years ago (and I am glad those photos can never be unearthed). Taaz.com, allowed you to contour the hair style to fit better onto your head (as my head is huge and round like a basketball). but I wasn’t done yet! so my next step was to download a free iPhone app called Make With Beauty that allowed me to take a picture of myself and change the color of my hair already. I couldn’t figure out how manipulate the hair color effectively in the app and my hair always ended up looking like it would glow in the dark. but the idea was to see what I would look like with a lighter shade of blue:
Looks like I dipped my head in some radioactive goo…A little to neon/glow in the dark for me- but still closer to what I wanted.
so by now I was getting pretty pumped up about the idea…Maybe a little too excited because following morning, I woke up and went straight to Ulta, where I hastily picked up a bottle of Jerome Russell’s Punky Colour in turquoise for only $9.99.
And here is when things get sketchy…
in my haste/over-excitement… I didn’t read the directions or the label completely and carefully and what I thought was NON permanent was actually SEMI- Permanent (the back says 5-40 washes).Which is a problem because I needed my hair to be back to a natural blonde hair color by the following week for work.
The directions said to leave it in your hair for 20-40 minutes and since I wanted a lighter color of blue (that would wash out quickly) I left it in for only 15 minutes. Little did I know that my hair was the PERFECT type (damaged, bleached, blonde, dry) to absorb and hang on to allll of the turquoise color.
After I washed out the hair dye, I took a look in the mirror and spent the next few hours washing my hair over and over in a blue blur of anxiety attacks and hyper-ventilating. I called out for help from friends on Facebook and Instagram, and read several articles for home hair color lifter remedies (I wasn’t close t0 being able to leave the house). With friends help and a great article on Wikihow (which I highly suggest looking at if you find yourself in the same position as I did) I tried all sorts of home remedies: soaking my hair in crushed vitamin C tablets, adding dish soap to my shampoo, adding laundry detergent to my shampoo, , adding baking soda to dandruff shampoo and again washing. These helped to lighten the color somewhat but left me with a new and even scarier problem: severe hair breakage!
It was during my cry for help from my friends on social media that my old college roommate introduced me to the amazing Alison and her blog The Alison Show. She had also dyed her hair a similar color, although she went the preferable route: to a hair stylist. She was so kind and reached out to me and said that she too freaked out when she first saw her hair in the mirror but that it washed out so quickly that she wished it had stayed longer.
After 48 hours of locking myself in my house and washing my hair over 10 times, I had resigned myself to my immediate future as a blue-headed smurf.
Within a few days I ended up really liking my mermaid hair and wishing I could keep it longer,
So here are some of my tips for if you want to dye your hair blue, green, pink or any other fabulous combination:
1) always READ THE LABEL carefully!
2) Before doing a semi-permanant or permanent color try something that will wash out in 2 to 3 washes such as:
3) Try out different styles using a smart phone app or Taaz.com
4) Be emotionally prepared!
5) Consider the damage level that any hair dye does to your hair
have fun and dye away. If you have any pictures or stories about your wild hair dye adventures, feel free to email me at ourwildpreciouslives@gmail.com with pictures and your story and I will share it!
Happy Memorial Day weekend everyone! Be safe and have fun!
Ever since I had the ability to write (non-sensical scribbles of a four year old count) I have kept a “diary.” I don’t know where the compulsion to keep a list of the daily mundane activities as a child: “Today I had rice crispies for breakfast…” The older i got, the more they developed into a living memory box of my life at that moment in time; and perhaps it started as my first paltry attempt at creating a sense of order from my distracted thoughts and messy brain. I have over 30 completed journals, which is roughly one per year. The style and format of my journals adapts to the seasons of my life. During college and Graduate school, my journal functioned as my day planner and the keeper of my sanity. During periods in my life where I have been happy, I notice that I do more art and very little journaling. During tough times however, my journals are filled with sad song lyrics, to-do lists and life questions.
Do you like to look back at your journals? If so, do you do it often? Is creating a written record of your life to reflect back on a reason for your journaling? I am very interested to know. I can honestly say that, that is not the case with me, as writing for reflection at a later period of time would require to much forethought and planning for me. My journal has become one of my few necessities which I carry with me at all times in my bag. It is given the impossible responsibility of keeping me sane (emotionally balanced and organized enough to survive) ..so when I complete one journal, I see it as a memento of the craziness which is my life- maybe one day, when I am normal, I will want to look back at my journals to feel sorry for my crazy self.
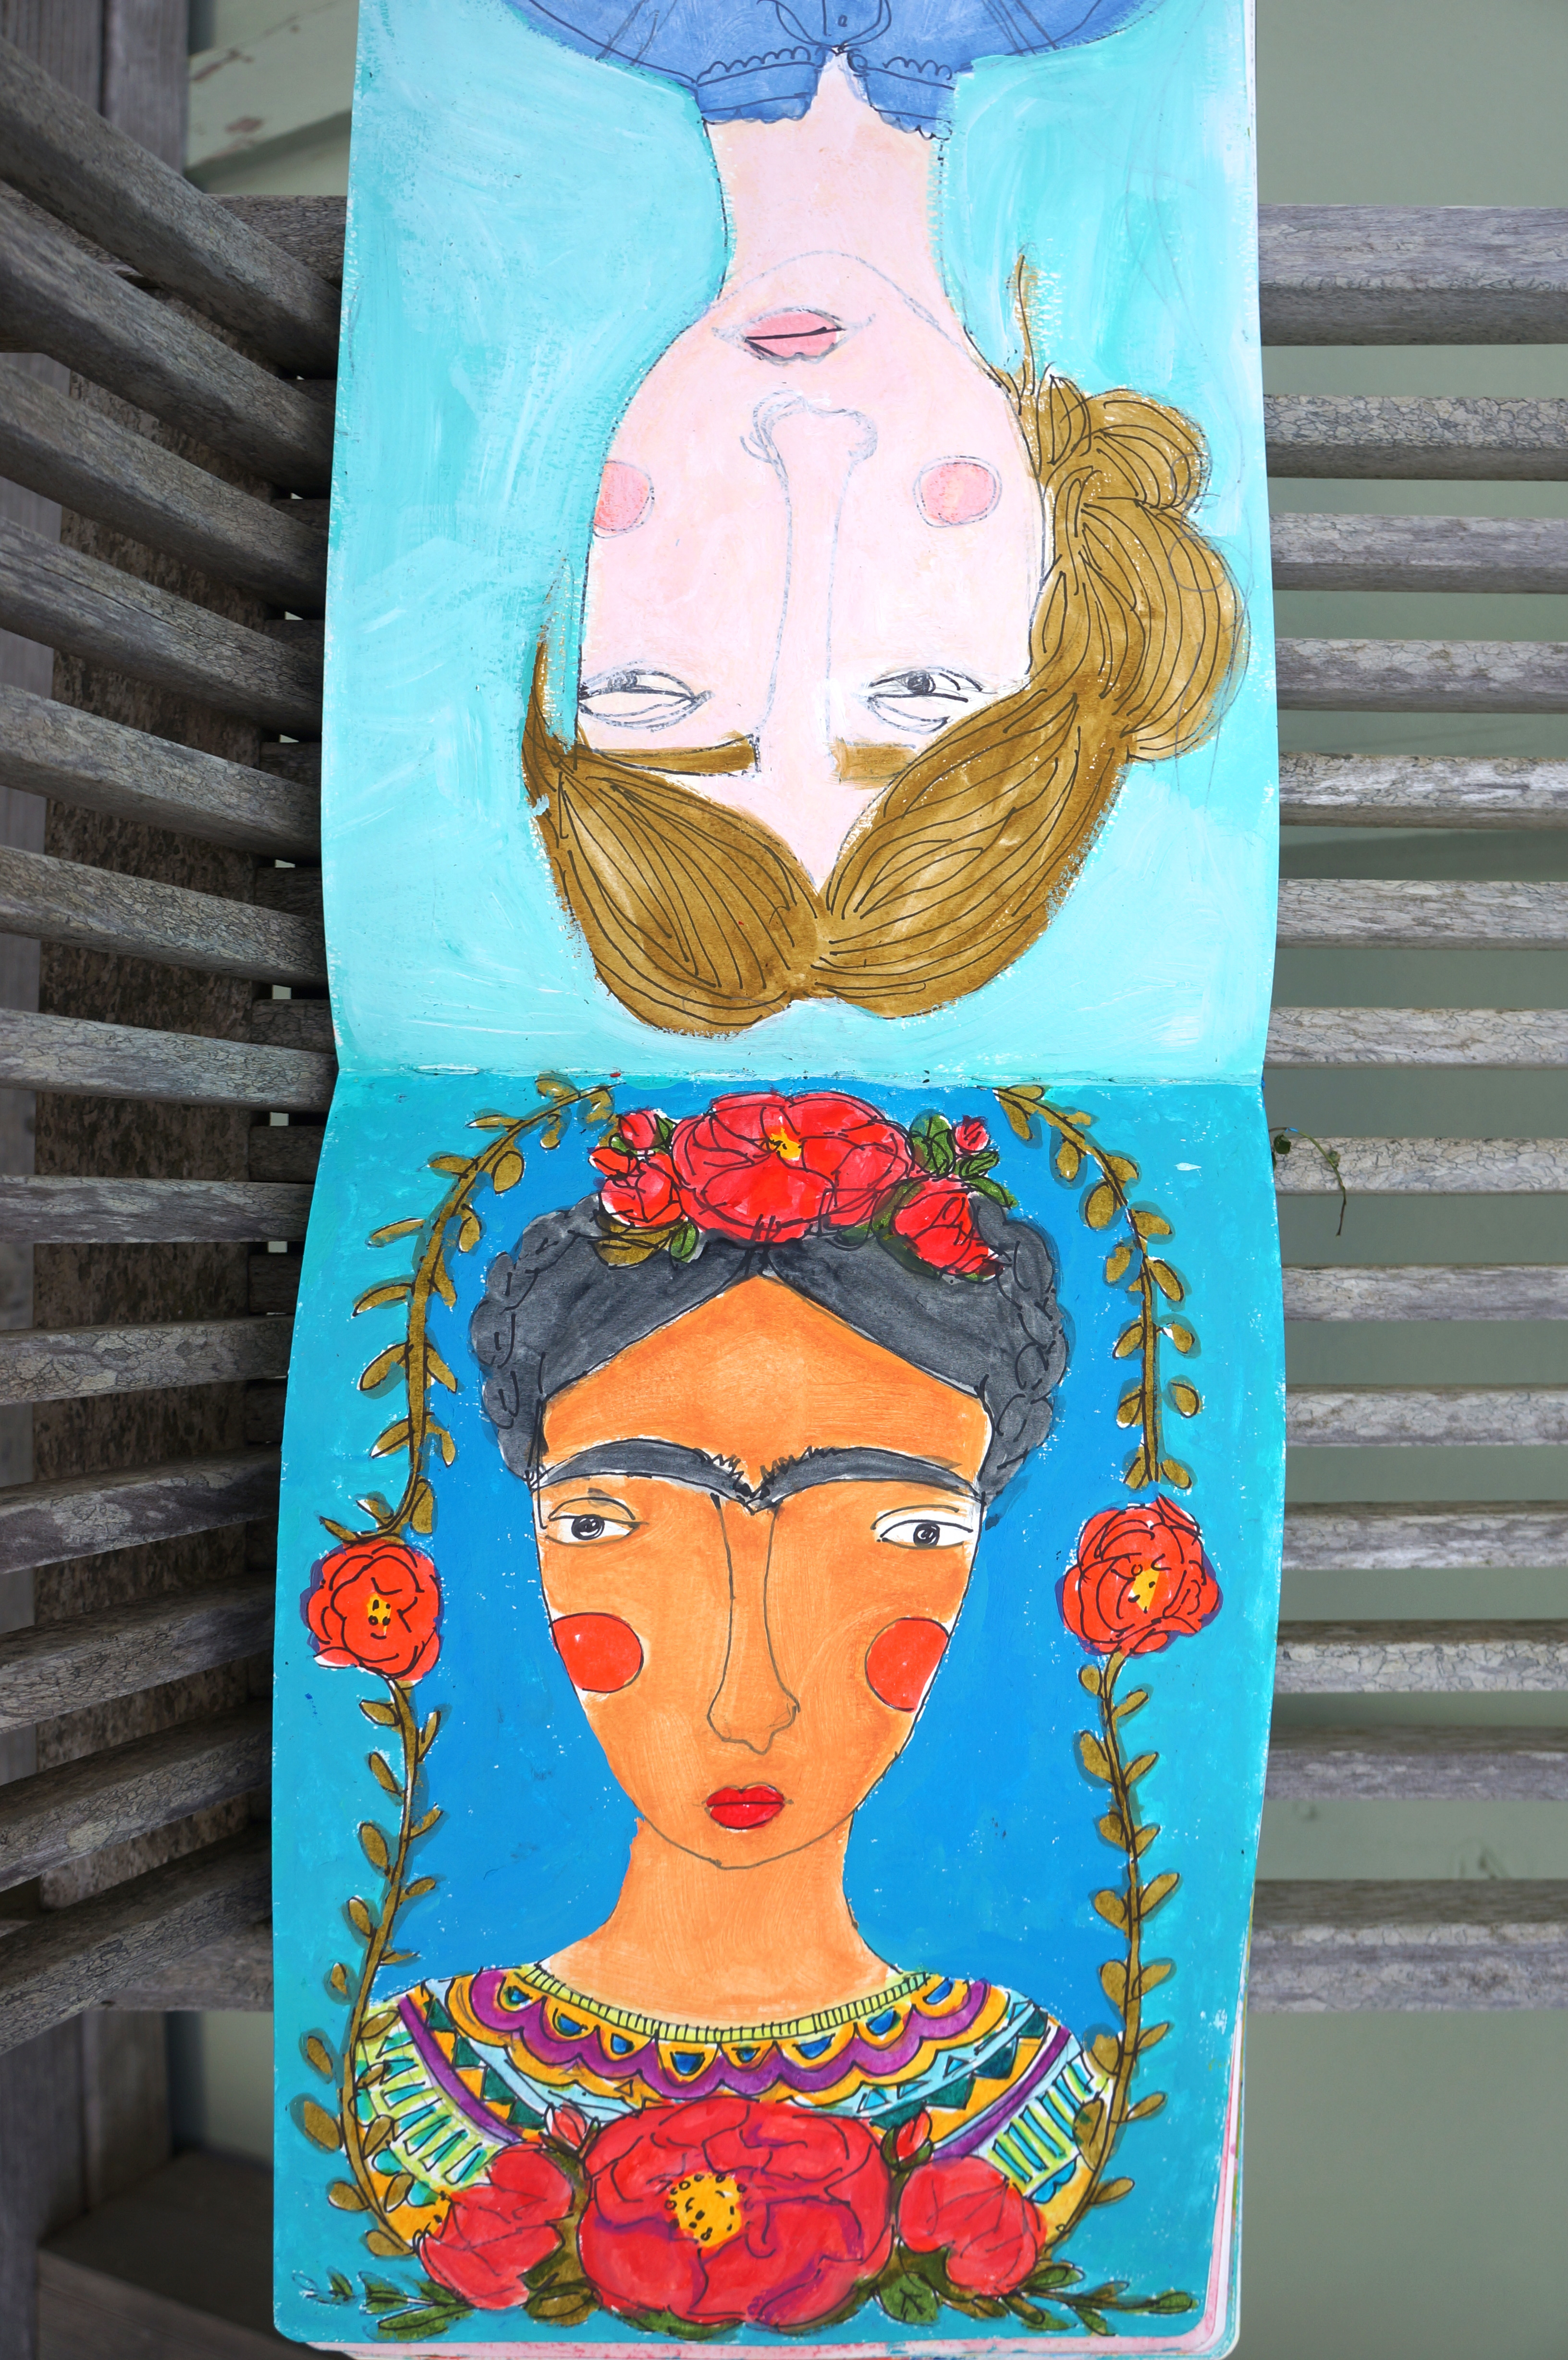
Here are a few of my own art journal pages:
my art journal pagemy colorful cactione of my favorite quotesFrida and Virginia from my journal.
Anyways, I love nothing more than seeing pages from other peoples’ journals. I feel like I am getting a naked glimpse at their soul. I am always so amazed and inspired by the creative, beautiful things that people put down onto pages. One of my favorite artists, Geninne Zlatkis, has the most beautiful and awe inspiring journal pages. I love all of her work and I also LOVE how she adapts her art journal entries into a day planner. Genius!!
from her flickr account (October Days) more of Geninne’s beauty
Here is the link to her flickr account for you to check her out more!: https://www.flickr.com/photos/geninne/sets/72157594514015991/
Another one of my favorites is Guilherme Dietrich. I fell in love with the bright, bold colors and vivid pieces. I had to pick my jaw up off the floor after I saw these. Unfortunately, his flickr account is no longer active and the website I found him on, isn’t either. But here are some of his beautiful pages to feast your eyes at (pangs me to know I will never create something this beautiful)
What inspires you? Why do you journal? I would love to see!
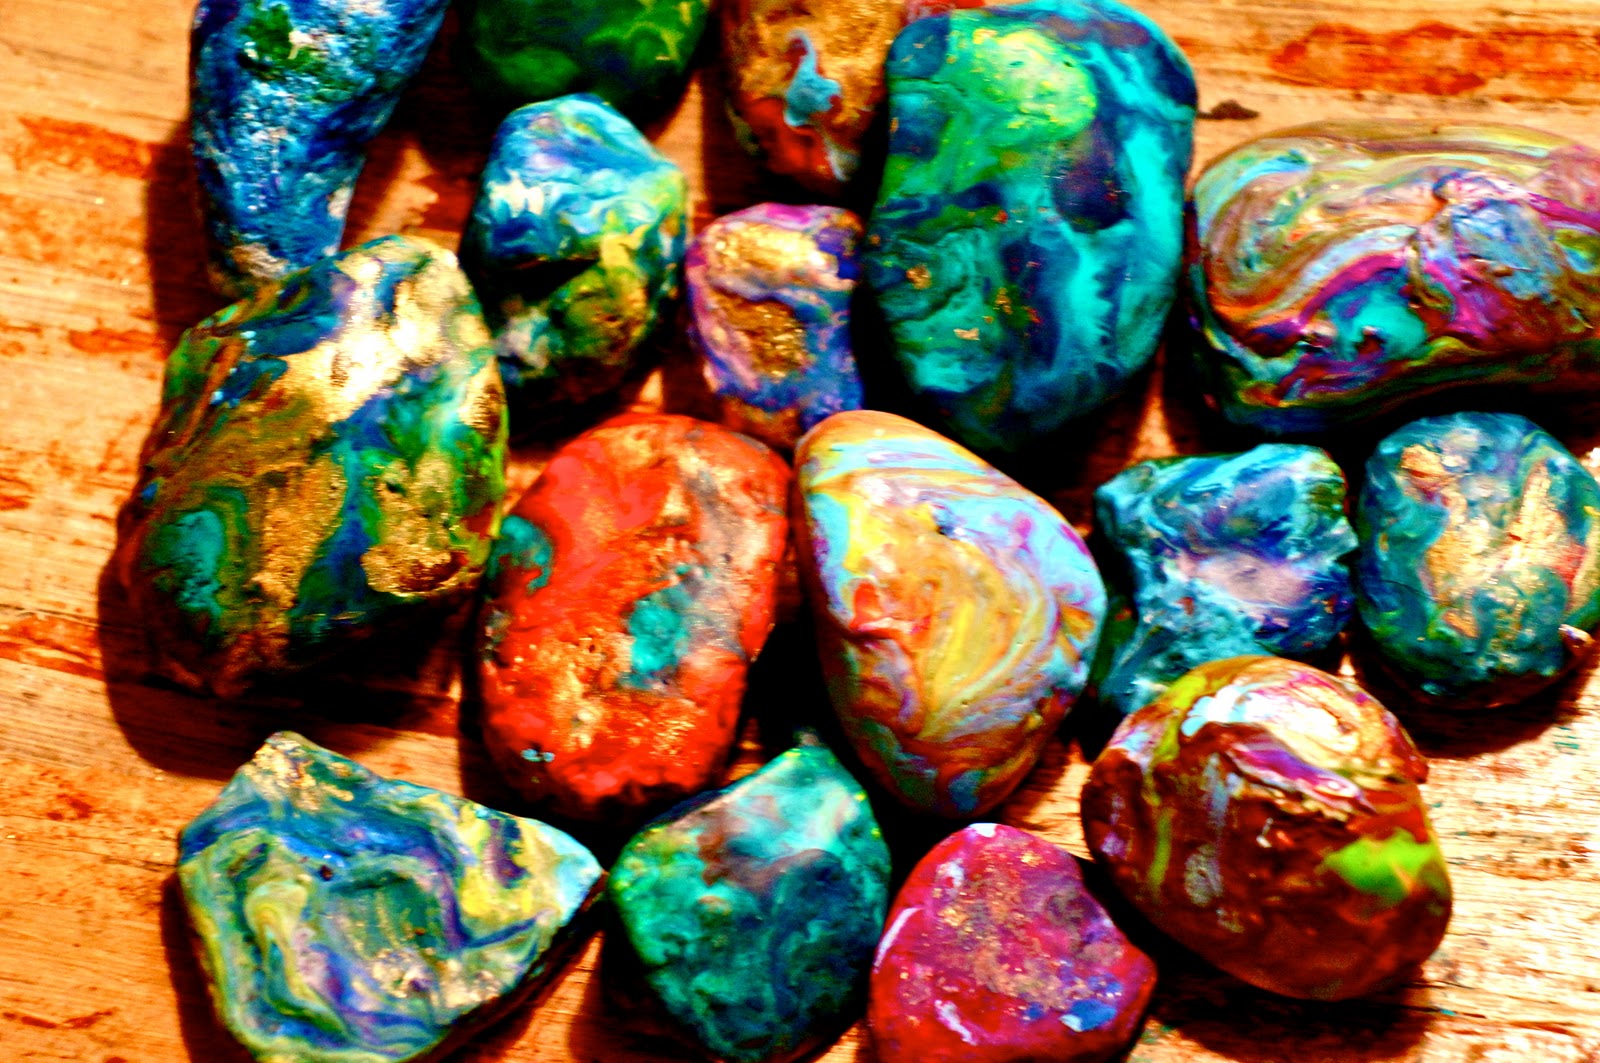
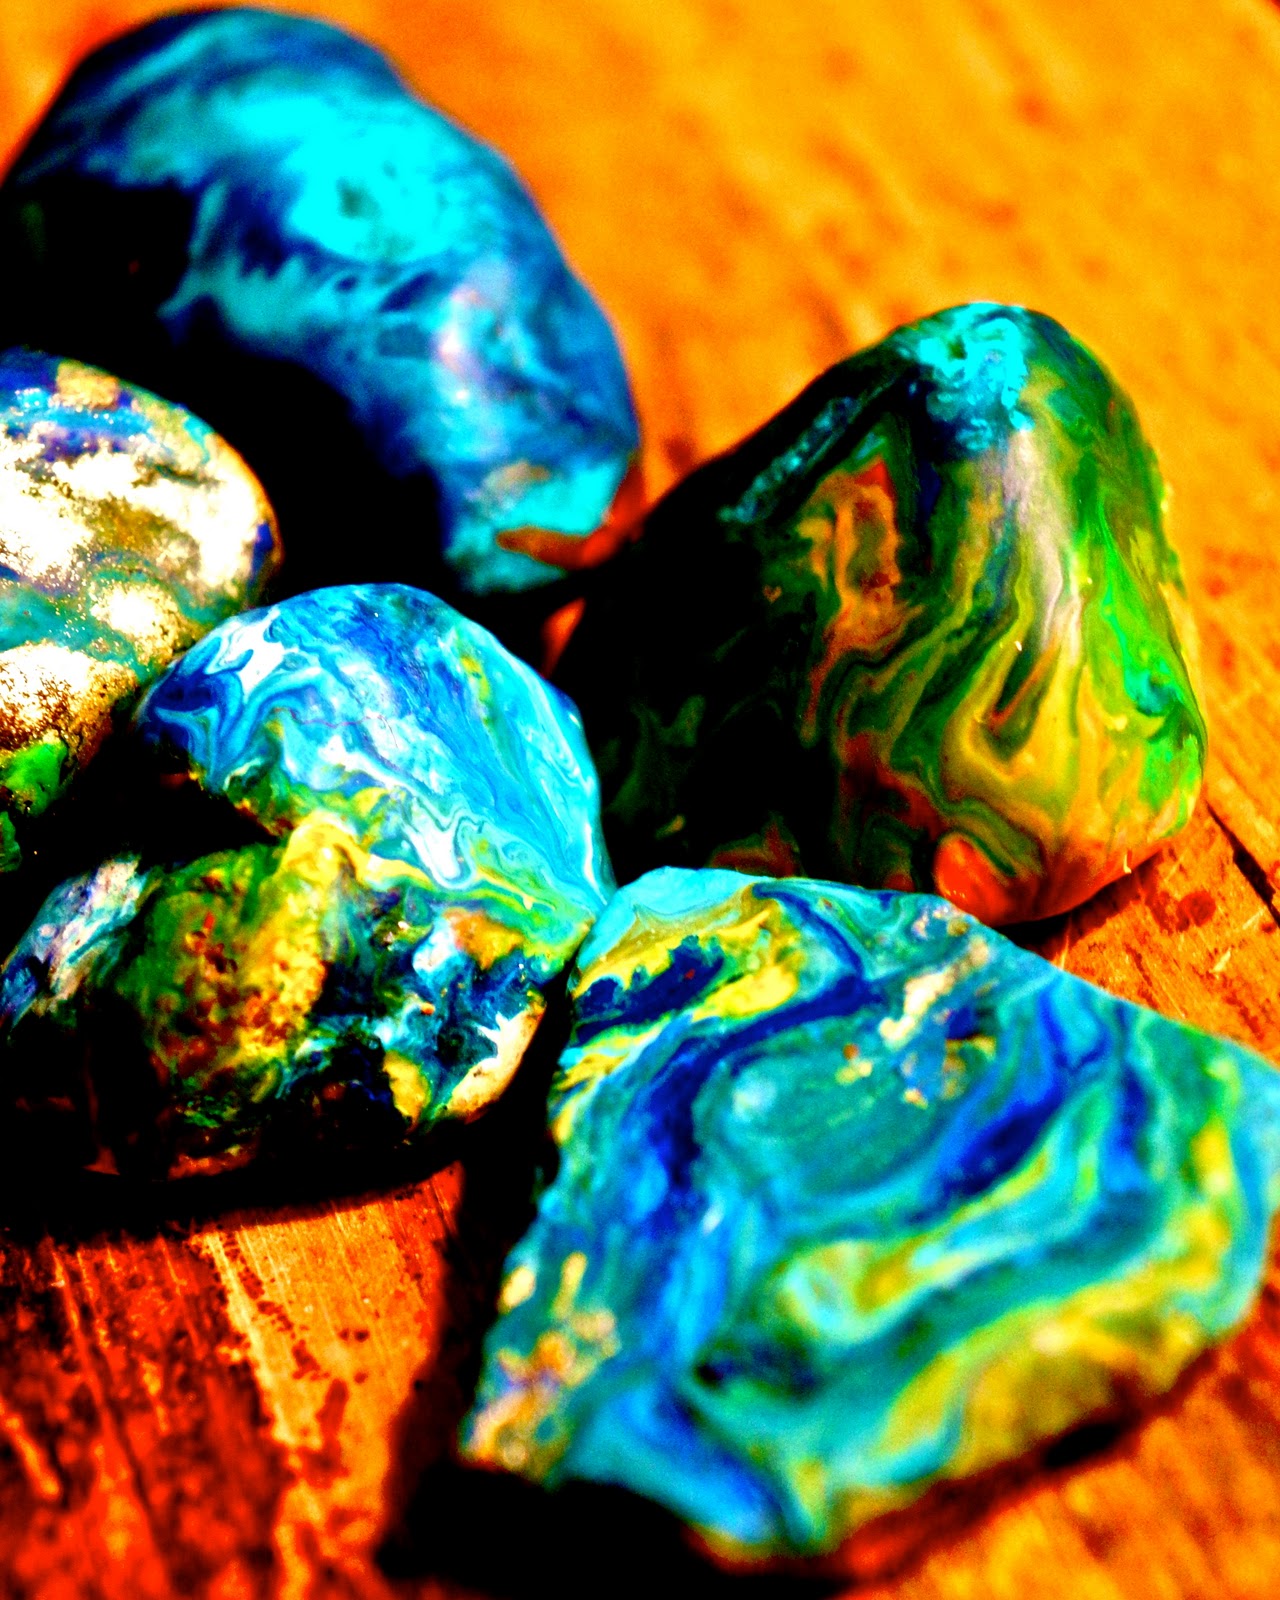
I love melted rocks. Melted rocks rock. I did this art activity with two 6 and 7 year old boys and I think I enjoyed it more than they did (probably because I wouldn’t let them touch the hot rocks…and you know how boys are…they only want to do what they aren’t allowed to do:) ). Something about the simplicity of the activity and watching the crayon melt and mix and swirl with the other colors is so relaxing.
You will need:
smooth rocks- pick out some rocks from your garden (preferably smooth rocks with flattened tops) or you can buy a bag of river rocks from a craft supply store for fairly cheap.
crayons- The Crayola brand work perfectly fine…I had some oil pastels I also tried using…a few of them worked, the more thicker and more expensive they were, the LESS they worked because they didn’t melt as easy and didn’t mix with the other crayons. ALTHOUGH, saying that, one gold oil pastel I had from Blicks art store turned out to be the best. So, try a few different types and experiment.
an oven- or access to one.
An oven mitts (those babies come out of the oven hot)
Foil paper
a large (and preferably old and well used) baking tray
Instructions:
Pre-heat the oven to 350 degrees Farenheit
Wash off and dry the rocks if you grabbed them from the garden
Peel the paper off the crayons you want to use
Put foil paper on the oven tray (to keep any melted crayons from getting on the tray)
Place the rocks on the tray and put them in the oven for at least 15 minutes (the hotter they are the better)
Take the rocks out using the oven mitt (if you are doing this with children make sure to warn them NOT to place their hands directly onto the rock because they will born themselves) and place them on paper plates or foil sheets
Put the crayon onto the surface of the rock and push down firmly for a few moments. Use several different colors to get a colorful effect.


