Categories
art lesson artist trading cards ATCs collaboration collage colors craft DIY project easy crafts elementary handmade kids activity lesson mixed media watercolors

Artist Trading Cards!

Ever since I got the “ok” to teach my art class, I have been WAITING for the session where I taught my students how to make Artist Trading Cards. And this last week, was FINALLY the time to do it! I was so impressed by the results….I loved all of them, they worked so hard on them. I was a little worried they wouldn’t take it seriously and give it %100 of their efforts but I stressed the importance of each card being like a mini-artwork….I loved how hard they worked and how unique all of them turned out…. 
How cute are these owls??? 
….I did a mini-lesson on creating “mixed media” pieces and showed them a couple of my favorites I have found via the web as well as some of my own ATCs. These are a few of mine: 
I brought in tubs of different materials including: magazine pages, fabric, yarn, glitter, watercolors, pens, markers, buttons, pom-poms…

I loved that each card never failed to showcase each students’ personalities…Here are a few of the ones the boys in the class did…they mostly stuck to markers and pens:
We are looking to SWAP with another classs….if you are an art teacher and have done or are doing ATCs with your students! Email me at jsheffield@kenilworth38.org
Categories
acrylic art art lesson book binding canvas colorful DIY project easy craft education elementary journal kids activity lovely mixed media original paint pintersest simple sketchbook

Art Lesson for Kids: Canvas Colorfield Art Journals

So, I’ve started my after-school art class at the elementary school where I teach. At first, I was nervously checking the office for completed registration forms and worried I wouldn’t have enough students BUT lo, and behold, I reached my limit of 20 students and went past it, ending up with 24 students in 2nd-4th grade!
In our first class, students created their own art journals using the “colorfield” technique of abstract painting and canvas. I found this lesson on Dick Blick’s website. Here is the link: http://www.dickblick.com/lesson-plans/color-field-sketchbook/
The finished art journals should end up looking something like this:

The kids LOVED making their journals but it was a little messy. I spent a good two hours after they left scrubbing the paint from the tables, stools, and floor. So, just wanted to CAUTION you if you plan on doing this with kids (or even if you do it for yourself) you will need LOTS of old newspaper, or trash bags, and paper towels. 
So, how to make these lovely journals you ask? All you need are various colors of acrylic paints, unprimed canvas, plastic cups, an empty spray bottle and some paint brushes. 
* For each color you want to use, squirt about tablespoon of paint into a disposable cup and then put about a tablespoon of water in the cup (less water for darker colors) and mix with a paintbrush until smooth. Choose 3 or 4 colors you want to use (remember that mixing more than 3 colors together in one place will create a brownish blah color) 
* Fill the spray bottle with water and spray sections of your canvas (this will help create the swirly patterns when the colors mix together with the water and the dry canvas). 
* Pour onto the canvas! 
Experiment with different colors and different “pouring techniques.” Try pouring from far away, to create a splash pattern. Use a paintbrush to flick a spatter pattern, or pour colors, then tip the canvas up, so that the colors create a “raindrop” or “drip” pattern. 
* Be careful of using too much water, or pouring too much, because it will pool on the canvas and mix with all the other colors to create an unpleasant brownish color. 
I spent way to much time on mine…I used a lot of white paint, because I found that it brightened the colors and kept it from becoming to dark. Here’s how mine turned out….I am sure if I was to make another one, it would be completely different. 
I think next time, I want to try a more simple approach; using only 2 or 3 colors and not worrying so much if there was blank canvas. 
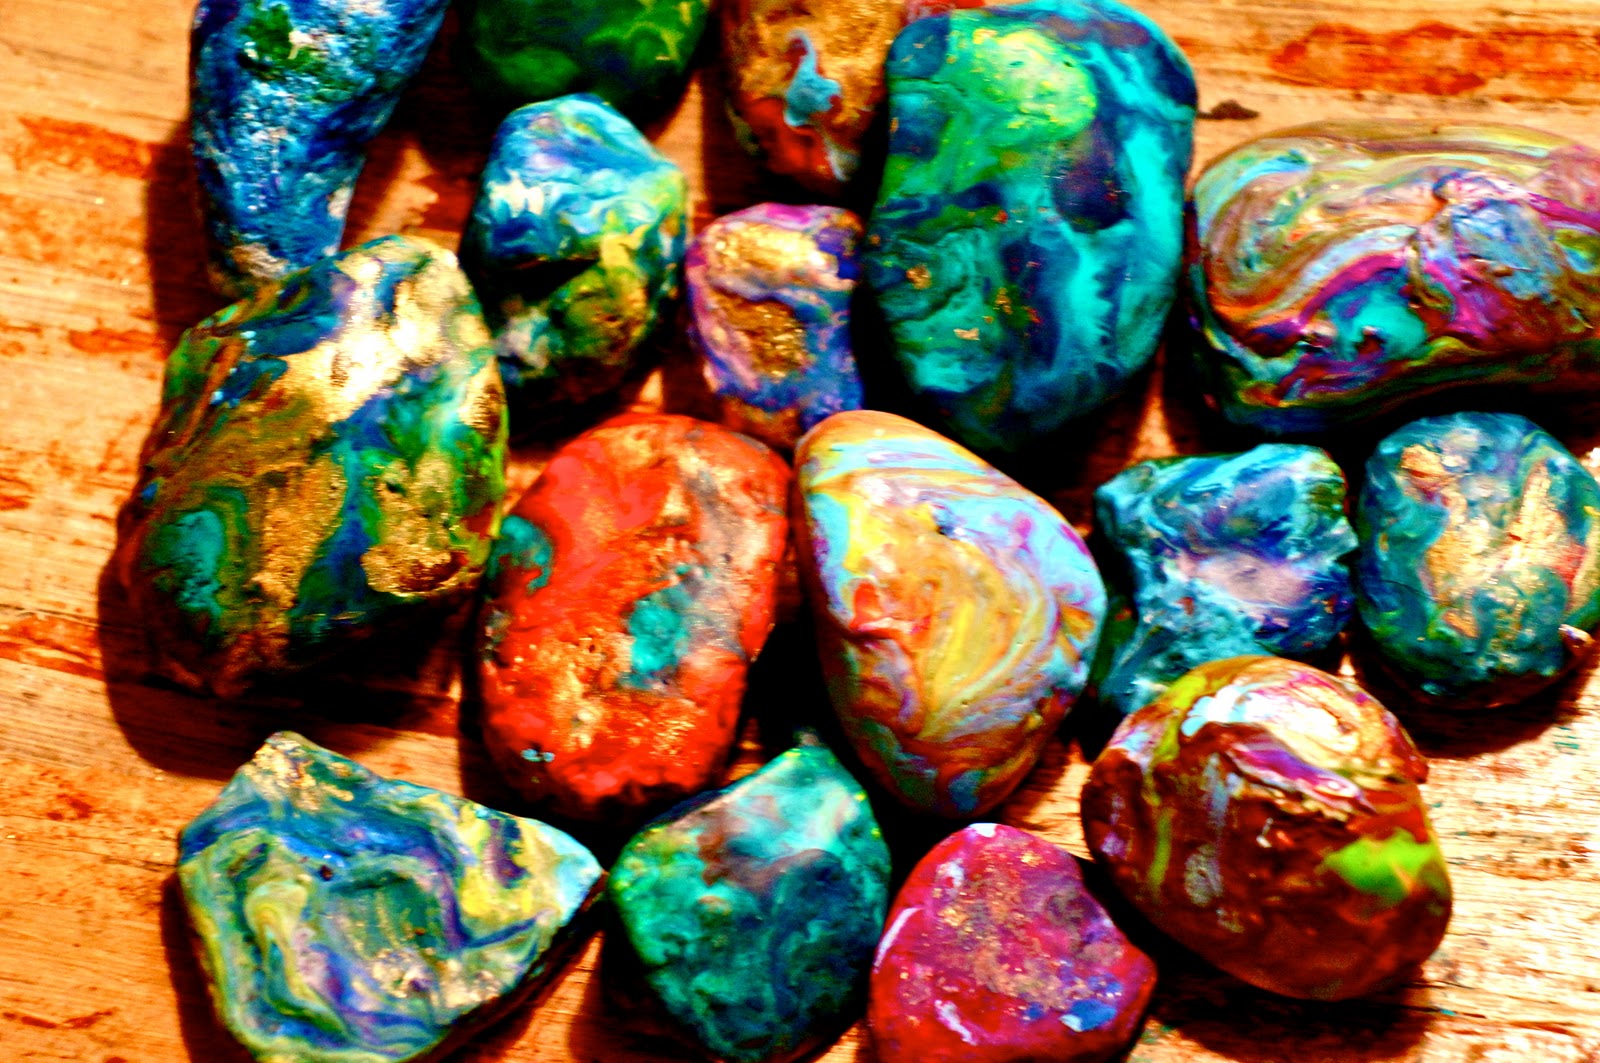
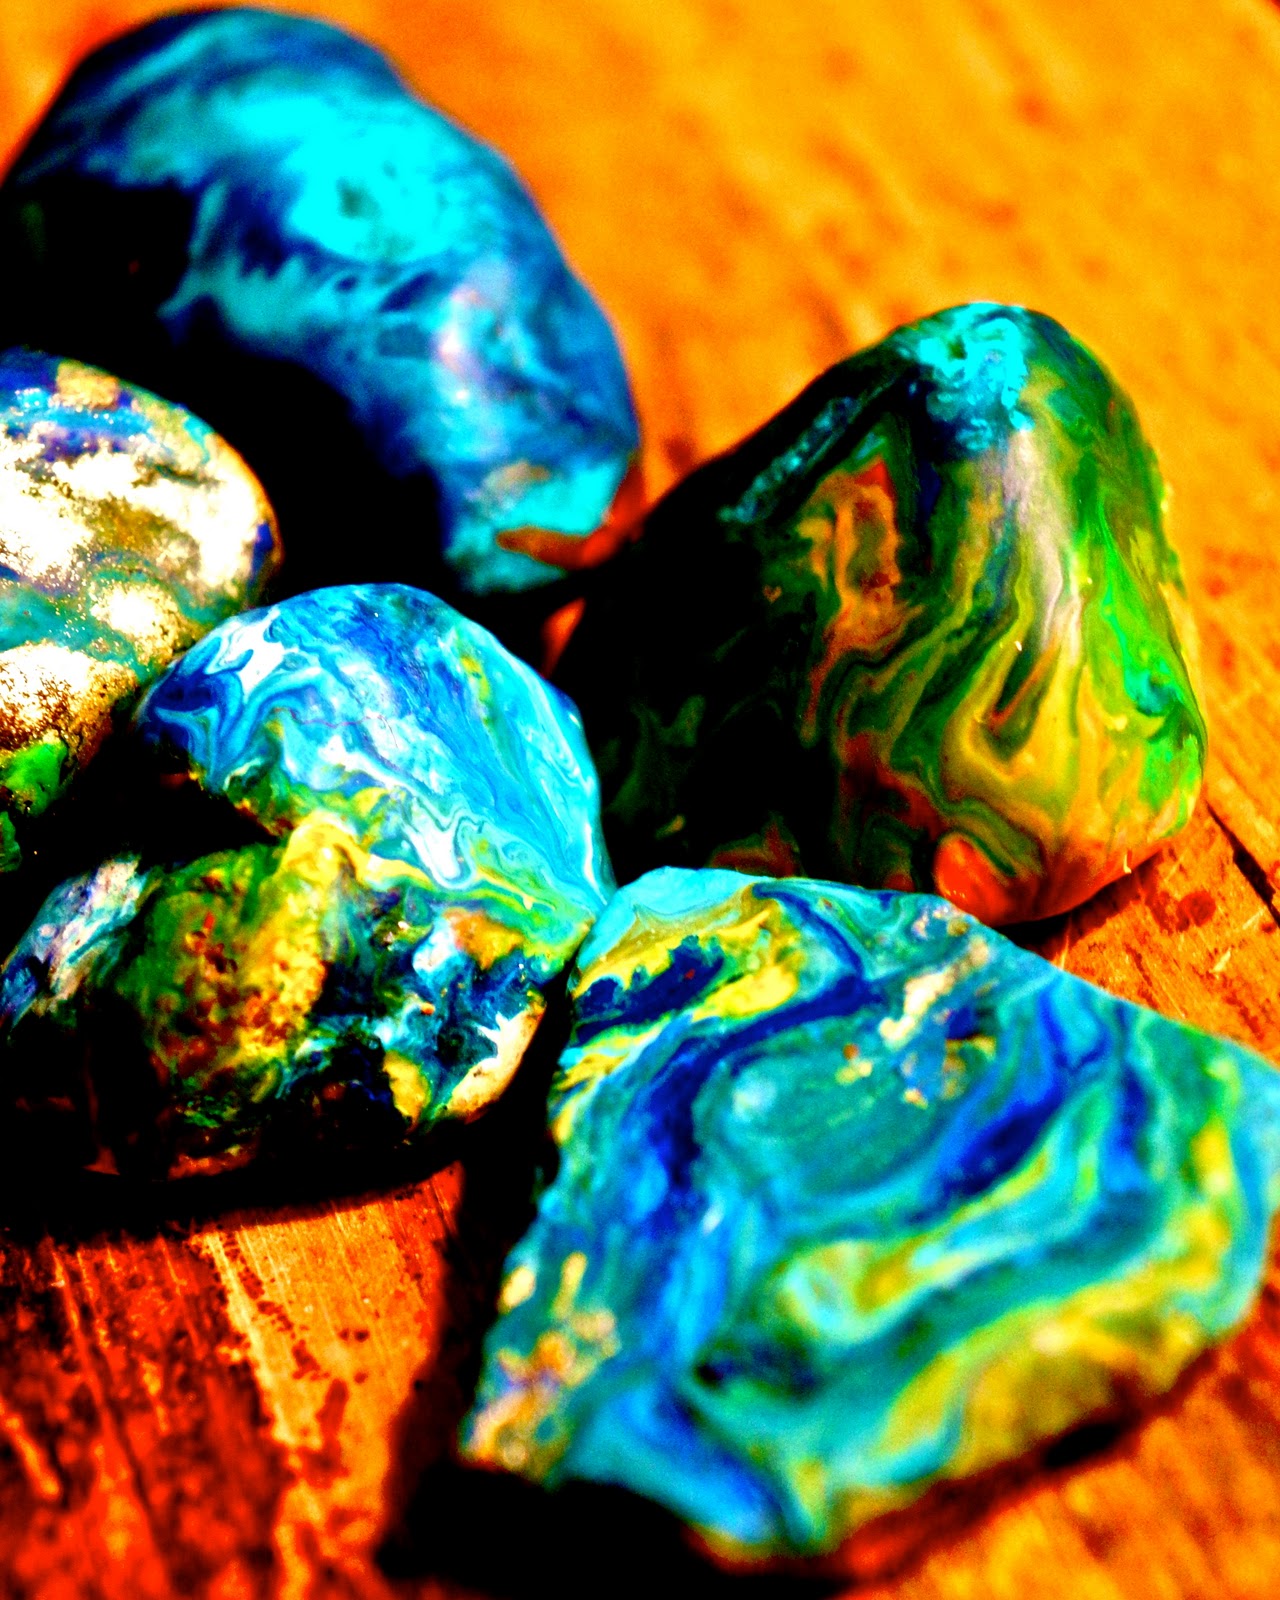
These are just a few of the outcomes from my students..I love how unique and colorful they all turned out. I can see their individual personalities in the colors they used and how they mixed them: 

Binding these guys is a whollllle other story!

Categories
design fashion floral hip ink inspiration pattern pinterest tattoos trendy tribal unique watercolors

tattoos: i want them, i need them pt. 2

It’s time for round two of beautiful tattoo designs I have been coveting lately. I swear, if I was in a stable job right now, there would be nothing holding me back Last night, while I literally spent all night long looking at people’s “boards” of tattoos on pinterest and found some beautiful, inspiring and unique tattoos. Sometimes, I fall in love with some tattoos but always in the back of my mind I cant help but think…how will I feel about this having to see this every day for the rest of my life?

Lately, (and I am pretty sure this change has to do with my new found obsession with pinterest), I am finding the most amazing tattoos that I would get in a heart beat.  I am being to see a pattern in the types of tattoos I love: simple lines and also brightly colored designs  saw a few beautiful colorful tattoos that look like water color paintings.

I LOVE the colors in the above blue flower tattoo. They are so rich and look so real and textured they look. I also love that the colors aren;t hindered by the thick dark outlines and end up looking like a coloring page….if that makes sense at all.

A few of the MANY stunning watercolor tattoos by artist Amanda Wachob. Check her work out at: http://www.amandawachob.com/gallery/skin/. I have never seen anything like these tattoos. 

Another example of beautiful colors and distinct blending. 

Do I love this tattoo or am I maybe blinded by the beauty and “coolness” of this model.

the tattoos I am most drawn too, can be categorized into two differing types.  First: simple and elegant lines and patterns;  second: bright and bold colors. This is the one I am leaning towards getting. Something about the simplicity of the lines calms me. While I am more drawn to big and bold colors; something about the simplicity and evenness of the lines calms me. Ever since I was born, I have always had an uncanny knack for creating unnecessary chaos in my life. My parents used to say they could always know where to find me by following a path of discarded and broken items. My husband is always shocked and annoyed at how quickly I can turn a room, or, my life, upside down. I tend to worry about everything and focus on the unimportant little things in life and I think this tattoo would serve as a consistent reminder to simplify my thinking. I don’t know why I think that way, but even just looking at the even circles makes me feel more peaceful.

I also really like this one but I don’t think I would get it on my hand. Mainly because, I don’t think I would be able to get away with it as an elementary teacher.

A couple more……LOVE all OF THESE!

Categories
apartment art cheap colors craft creative cute decoration design diy easy green home decor print projects recycled

diy recycled wall decor

This is my take on a recycled magazine pages wall decor project that I saw the other day when passing by the window display at J. Crew. These are my favorite projects to do because they are CHEAP (well, basically free!) colorful AND green! A big BANG for a little bitty price. 
Here is J. Crew’s current window display that inspired me: 

Of course, they have done about a MILLION, so I have a LOOONG way to go until mine looks like that…and let’s just be honest…I probably will get bored of doing these, or find something else I want to do before I get enough to make a wall decoration!

All you need are some old magazines, rip out the colorful pages and accordian fold them. I used a glue gun to insure they would stay glued and to give it some rigidness.

I would love to see any pics of any diy art projects you have done lately around your house!

Categories
art lesson art lessons beautiful cheap children colorful crayons cute decorations DIY creative easy education fast fun home decor kids activity oil pastels rocks simple teaching

fun and easy art activity for kids

I love melted rocks. Melted rocks rock. I did this art activity with two 6 and 7 year old boys and I think I enjoyed it more than they did (probably because I wouldn’t let them touch the hot rocks…and you know how boys are…they only want to do what they aren’t allowed to do:) ).  Something about the simplicity of the activity and watching the crayon melt and mix and swirl with the other colors is so relaxing.

You will need:

  • smooth rocks- pick out some rocks from your garden (preferably smooth rocks with flattened tops) or you can buy a bag of river rocks from a craft supply store for fairly cheap. 
  • crayons- The Crayola brand work perfectly fine…I had some oil pastels I also tried using…a few of them worked, the more thicker and more expensive they were, the LESS they worked because they didn’t melt as easy and didn’t mix with the other crayons. ALTHOUGH, saying that, one gold oil pastel I had from Blicks art store turned out to be the best. So, try a few different types and experiment. 
  • an oven- or access to one. 
  • An oven mitts (those babies come out of the oven hot) 
  • Foil paper
  • a large (and preferably old and well used) baking tray
Instructions: 
  •  Pre-heat the oven to 350 degrees Farenheit 
  • Wash off and dry the rocks if you grabbed them from the garden
  • Peel the paper off the crayons you want to use 
  • Put foil paper on the oven tray (to keep any melted crayons from getting on the tray)
  • Place the rocks on the tray and put them in the oven for at least 15 minutes (the hotter they are the better) 
  • Take the rocks out using the oven mitt (if you are doing this with children make sure to warn them NOT to place their hands directly onto the rock because they will born themselves) and place them on paper plates or foil sheets
  • Put the crayon onto the surface of the rock and push down firmly for a few moments. Use several different colors to get a colorful effect. 
  • Let them cool. 

and WHALAAA! Glorious- beautimus rocks!

Categories
art blue cheap creative decoration DIY project easy craft feathers flowers free home decor jewelry lesson nature organization simple wall art

Simple Wall Decor/Jewelry Organizer

I have always liked doing art projects and diy decor projects with sticks. They are free, abundant, and come in all different shapes and sizes. I tend to do a lot with branches in the winter because there are dead branches all over the neighborhood.

This super simple hanging branch diy project is my take on a similar project i found on pinterest.

Categories
art cheap chic clothes crafts design diy easy craft etsy fun gift jewelry Martha Stewart necklaces t-shirt trendy

easy peasy T-shirt necklaces

I lurrrv t-shirt necklaces! These are two that I’ve made. They are super easy to do and make a big impact. I also use them as scarves in the winter. Here is a tutorial. Just need old t-shirts and scissors.

Categories
accessories art lesson bright cheap colorful colors crafts creative cute design diy easy etsy felt flowers necklaces original projects trendy vintage

Felt-tastic Necklaces


Happy New Years!!!! I hope everyone had a fantastically memorable New Years Eve. Mine was definitely memorable but not so much fantastic.  We listened to a really horrible 70’s cover band (in TIGHT COSTUMES!) and watched a bunch of surprisingly limber, but incredibly inappropriate drunk old women dance.  Next year, I’m not even going to try. I will be at my house, with my husband and my dog; which is always what I wish I was doing when I am out on New Years Eve.

Anyways. Back to felt. fantastic felt! felt-tastic.

Felt. I love this stuff! I’ve been hearing a lot about felting crafts in the past few years- it seems to be what all the cool kids are crafting these days- but,  as usual, I am running a little bit behind with the “trends” and have only just fallen in love with felt! And fell hard! 
So I thought I would share this felt flower necklace craft that I’ve adapted from a couple of different crafters….I love Martha Stewart’s fabric flower necklace and have unsucsessfully attempted it several times but my flowers don’t look anything like Martha’s. And I KNOW for a fact that I picked up the felt flowers from some creative and inspiring crafter on the internet but I cannot find the website for the life of me! I’ll add the links in when I find them.  
Making the felt flowers are super easy. All you need are felt squares, which come in so many different bright and fun colors (Michael’s has them for $.29 per 8 x 11″ sheet), permanant marker, craft scissors, tacky glue (the clear kind works the best) and random circular objects of various sizes!  They come in so many bright and fun colors too.  Just trace various sized circular objects and cut them out. 

 The next step is cutting the felt circle by cutting in a circular spiralliing motion. Then, starting from the inside, with the smallest circle, overlap the layers to create wider and wider circles. Dab some clear tacky glue every once in a while on sections of the felt and then a dab of clue and the ending tip to keep it together.

Once you have a good amount of completed felt flowers, (as you can tell from the above pictures of my felt flowers, I got a little OCD and made way more felt flowers than is needed), then you need to make the base of the necklace. I’ve used a kidney bean shape to create a curve around the neck, but you can do anything really. 

 Using needle and thread, arrange the flowers and sew them onto the backing. I also threw in some

colorful beads. 
Thanks to my beautiful friend Mary who was nice enough to be my felt-tastic model!

Categories
cheap christmas Christmas decorations crafts diy DIY project easy crafts glitter holiday home decor reindeer

DIY Holiday Idea: Glitter Reindeers!

13 days until Christmas! YAY! Anywhooo…I made these three reindeers for under $15.00 total and so can you! All you need is: 

* tacky glue
* 3 wooden reindeers or other Christmasy wooden pieces ($3.00 a piece at Michael’s)
* 1 canister of glitter
* ribbon/string to hang

First, simply cover your reindeer with tacky glue ( I did mine in sections so that the glue wouldn’t dry before I covered it with the glitter) and then sprinkle generous amounts of glitter onto the glue. Of course, remember to place paper under your reindeer so glitter doesn’t cover your floors (Being as I am a messy person, even with paper, my floors are still sparkling).
After, applying the glitter, let the reindeer dry overnight or at least for a few hours. When you pick them up to finish them after they have dried, give them a good shake, to let the extra glitter off onto the paper and not your floors (I learned this the hard way).
Then, I used wire and a glue gun to make little loops to thread the ribbon through, but you can glue the ribbon directly to the back of the reindeer…it will save you time.

Finally, hang out reindeer in a viewable place and when people comment on how great they are…you can brag about how you made them for $15.00. 

Categories
cheap chicago Christmas decorations christmas trees diy easy crafts fun home decor rustic seasonal decor trendy

Holiday DIY Decor: Yarn Christmas Tree Cones

I got inspired to do these super simple and cheap Christmas trees after seeing a pin on pinterest that came from Thriftyandchic.com: 

soo cute and rustic! But I didn’t have any hemp yarn so I used some thick wool yarn (and instead of styrofoam cones like the ones thriftyandchic.com uses, I used paper cones). All you need is a few yards of thick yarn of your favorite color, a glue gun and a paper or styrofoam cone and you are in business baby!

A simple, easy, chic and unique DIY Holiday Decoration!

Anyone out there done any of their own DIY Holiday decorations lately?  I am always looking for inspiration!

Categories
art art lessons crafts creative diy elementary inspiration kids nature school teaching trees

A Student’s Artwork: Our Classroom Tree House

I was so touched by this 2nd grader’s drawing that I scanned it into my computer and want to get a professional copy of it framed….

At the beginning of the year, the students wrote about their “Ideal Tree houses” for a creative writing lesson. They all really loved writing about their dream tree houses and included some pretty cool stuff (lots of slides, elevators, swimming pools, hidden rooms, ect) and one student took it a step further and drew a tree house that had a room for every student and teacher in it!

When I saw it, I almost teared up (I’m a big softie), because I figured, being a teacher, my room would be extra small and tucked away in a corner, far from all the fun stuff. BUT, lo and behold, ole’ Mrs. Sheffy had not one but TWO of her own rooms….one was for living in and the second (the one that really got me) was my own art studio!
My living room is the first room to the right of the ladder, as you are climbing from the bottom up..titled “Mrs. S.” (I love it, I’m Mrs. S!) and then my art gallery is on the same level but all the way to the right..titled “Mrs. S art gallery” in smooshed letters…its kind of small, but thats okay, art galleries don’t have to be big! Here is a close up shot…

 I love working with this age of kids because they are such big dreamers and (most) see the best in each other still and I thought it was so wonderful, I wanted to get a group hug and stand in a circle holding hands singing the Barney song or something… (okay, no not really, but still)….just wanted to share.

Also, I am thinking of adapting her artwork into an art lesson, I think it would be really cool. So creative and sweet.

Categories
80's 90's art artist trading cards bill murray design E.T. Fraggle Rock Ghostbusters ink milo and otis movies original paint pop culture T.V. watercolors

you are the…

a new idea I had the other night when I was watching What About Bob…(my favorite movie) and thinking of how I feel like sometimes I am Bob Wiley and my husband is Dr. Leo Marvin.

and it just kept going from there….

you are the milo to my otis.

you are the fraggle to my rock.

you are the elliott to  my e.t.
 (can you tell I grew up in the late 80’s/early 90s?)